In fact, I have had so much fun that I wanted to share – and extend an invitation to others to guest blog here at Disneyways!
Anyone can apply but special consideration will be given to my current readers and subscribers.
This is because many of you all have been with me since the beginning, so you are familiar with our mission statement and the positive, upbeat feel of our site.
Welcome back, Oz and beauty fans! On my last guest post, I brought you a pretty yet strong look created using Urban Decay’s Glinda palette. However, Glinda isn’t the only witch in Oz: The Great and Powerful! Theodora is a young witch, beautiful and naive. In early Oz movies, the Witch of the West is a dark force; in Oz, Theodora wants peace in the land(according to trailers…hmmm…guess we’ll have to head to the movies to find out for sure!).
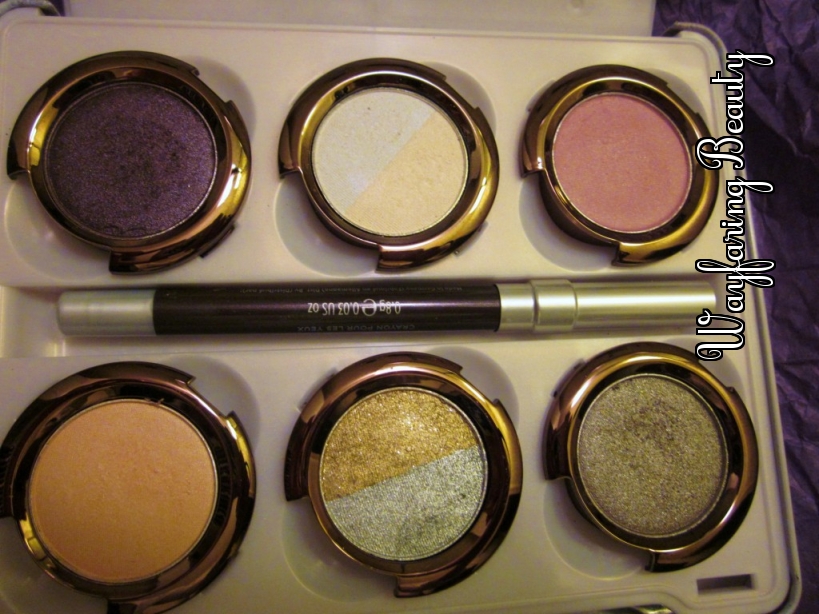
Urban Decay describes her as “fiery, strong-willed, and spellbindingly beautiful.” The palette they created for her certainly fits the bill! This palette contains six dark, sultry eyeshadows, a black eyeliner, and a fiery red high-gloss lip pencil.
As a brunette with brown eyes, I find that warm, brown shades suit my coloration the best. Red is my favorite color, although I usually wear the shade in clothing rather than on my lips. All in all, the combination of colors in this product are what led me to snap this palette up, even before I bought the Glinda one. Urban Decay makes stellar beauty products and I knew that this would be a palette I’d reach for again and again. This palette is great for everyday looks, but I decided to create a more dramatic look to possibly wear to the Oz premiere on March 8th. Below I’ll take you through the look, step by step; see captions for directions.
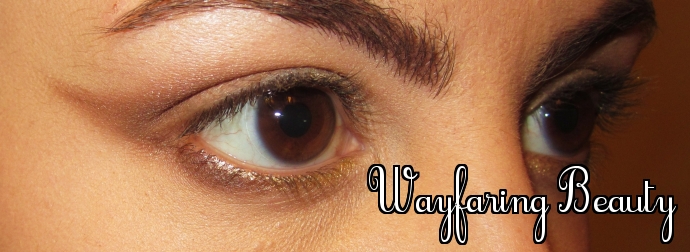
Prime the entire lid; then apply Broken (bone white) to the brow bone and inner corner
Pat the gold half of Spell onto the inner half of the lid; do the same with Beware (light caramel brown) on the outer half. Line inner half of lower lash line with the gold as well.
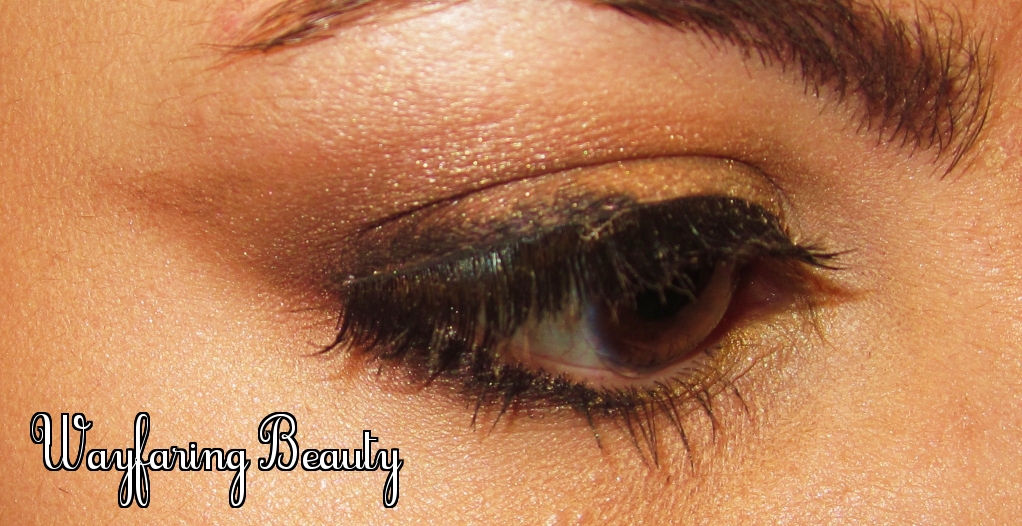
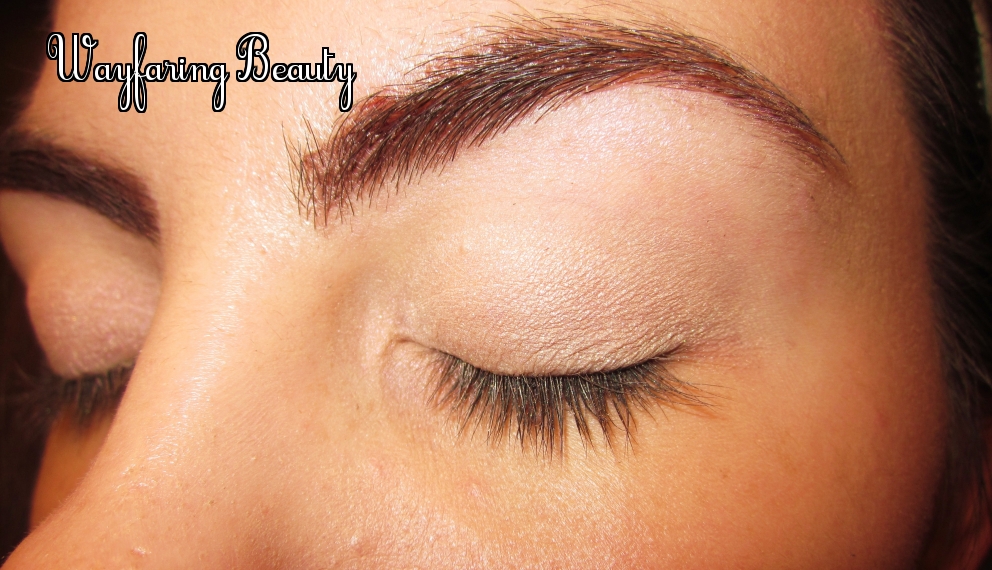
Apply Bewitch (warm chocolate brown) to the crease and bottom lash line, winging it out past the brow
How your wing should look with your eyes open
Apply West (deep reddish brown) to the outer v, blending where it meets other shades
Line with Zero and apply mascara. I also put on some falsies for a little extra flair.
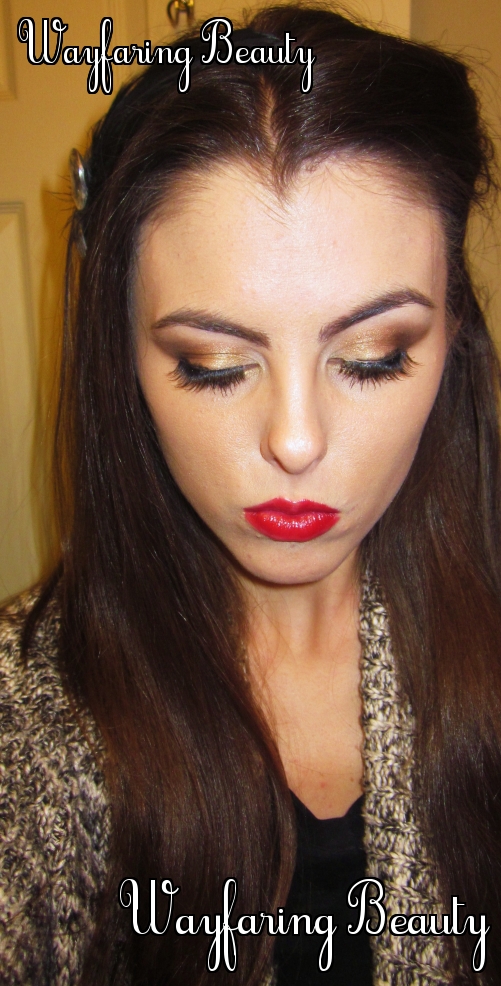
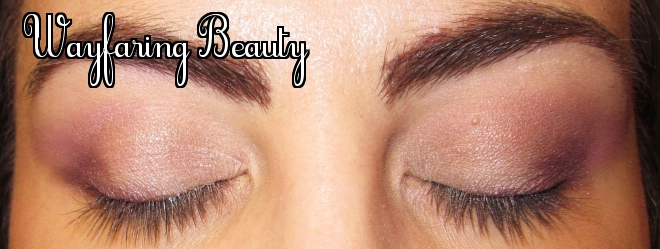
I finished my look by adding a shimmering highlighter to my cheekbones and applying the Theodora lip pencil (a warm-leaning cherry red) on my entire lip. Below are before and after shots – I used the before shot from the Glinda post because…well…I generally look the same without makeup, regardless of the clothing I have on. Click to enlarge:
Before
After
After
So what look do you think is best for the premiere – a warm, strong “dark” look, or a delicate, spellbinding “good” look? Which witch is more your style overall – Theodora or Glinda? Let us know in the comments!
Going to any Disney park or resort should be a magical experience for the whole family, but especially your young ones. They will forever cherish those priceless memories, and your entire family will reminisce on the magical Disney vacation they first took together.
It is truly the happiest place on Earth, especially if you follow these tips!
Do stay on site
Staying on Disney property will make your trip much easier. You will have access to Disney’s reliable, comfortable, and safe transportation throughout your stay. From the moment you step off the plane to the day you head home, you will not need to worry about finding transportation to your hotel, the parks, or to any places on Disney property. This should keep your little ones more focused and should prevent them from feeling frustrated as the long days of commuting wear them down.
Do bring or rent a stroller
Even if you never use a stroller for your toddler, you definitely will need one in Disney World. There is a lot of walking, and a lot of stuff you will be bringing with you. Little ones will want a place to sit and rest, get shade from the sun, and possibly even nap. In addition, the stroller is a great way to store all the stuff you will bring with you.
Do keep hydrated and pack snacks
Photo property of CheapskatePrincess.com
YES you can bring food into the parks. Check with guest services for current rules on this. Make sure you keep yourself, the other adults in your party and your kids hydrated and fed. Hydration is especially crucial as it can get very warm, and you will be doing a lot of walking. Granola bars and other simple snacks will keep them happy when waiting on lines for rides and attractions.
Do plan breaks during your day
If you are relentlessly on a roll, the whole family will be melting down by noon. A great idea is to get to the park when it opens, then head back to the hotel midday for naps, rest and maybe swim. Then head back to a park in the late afternoon.
The Big Blue Pool at the Art of Animation Resort
Do pack small gifts that you can carry with you and give out when needed
You can also find fun toys on etsy.com like this one from SweetsByEj.
There is merchandise to be bought everywhere you look. Before your vacation, visit a Disney Outlet or other related retailer (I always find stuff at Dollar Stores and Walgreens) to stock up on t-shirts, figurines, stickers and stuffed animals. You will save a lot of money when your kids are begging for something, and you can take out a surprise item for them!
Do not try to do everything
There is so much to do and see, and you will want to do everything. Resist the urge. Pick out the rides and attractions you feel your children will enjoy the most. Your children are little, so keep it to one park a day. Remember: you want a reason to come back! There are different phases where kids can enjoy Disney!
Do not force your child to go on a ride if he or she is resistant
If your child does not want to go on a ride, see an attraction or meet a popular Disney mascot, do not try to force him or her. Even if you have waited an incredibly long time, or if you just “know” your child will love the ride, attraction, or their favorite Disney hero, let them skip it.
Do not forget sunblock
Even on cloudy days, everyone in your party needs sunblock. Unless you are at an inside ride or attraction, do not forget that there is very little shade at the parks. Even on colder days, the California or Florida sun can be very strong. Protect the skin of your whole family, especially our little ones who are more susceptible to burns. If you are traveling in the winter months you will still need it
Do not travel at the most crowded times of the year
If at all possible, try to avoid the most popular times. These include all major holidays, long weekends, and most of the summer. Try to pick the off times such as late September to early November, early December, mid January to early February, and early to mid May. While you will find crowds at all times, these times will be more manageable. Those lines will weigh on the you, and not to mention fussy toddlers.
Do not forget a light sweater and blankets for the evenings
The days may get incredibly warm, but as the sun sets it can get cooler. Depending on the month as well, the later half of the day and evenings can get really chilly. Make sure you pack a sweatshirt for every member of your party. For the little ones, you might even want to make sure you have a blanket they can snuggle under in their stroller.
EmbroideryMark makes a pillow, backpack, and blanket all in one! You can even get it personalized.
If you follow these easy tips you are sure to have a fantastic vacation! I cant guarantee there won’t be a meltdown here and there, but it will be much more manageable.
Jennifer is an Authorized Disney Vacation Planner with Destinations In Florida travel, offering FREE concierge planning services for all guests. Contact her today for a FREE quote.
It’s almost time for the release of Disney’s Oz the Great and Powerful and I’m so unbelievably excited! I’ve been a Disney fan my whole life and have always leaned more towards the imaginative, fantastical tales. Needless to say, I’ve been antsy to see Disney’s spin on a prequel to the Wizard of Oz ever since I heard it was in production. Even better? Companies in the fashion and beauty worlds have been releasing Oz-themed products leading up to the premiere. Of course I had to get my hands on them and today I bring you Urban Decay’s Glinda palette, inspired by the good witch of Oz.
The inspiration
Every photo in this post is set to enlarge when you click on it – to show detail. The Glinda palette features 6 pans of eyeshadow, a high-gloss lip pencil, and a travel-sized eyeliner. The color palette is feminine and delicate, with a little edge thrown in. Glinda is described by Urban Decay as “graceful, fearless, and bewitchingly beautiful,” and this palette embodies those traits perfectly.
Top row, left to right: Tornado, Aura, Magic 24/7 Glide-on Eyeliner in Rockstar (a deep purple) Bottom row, left to right: Illusion, Oz, South
I immediately snapped up this palette because I think the colors are gorgeous, plus Urban Decay is one of my favorite beauty companies. They make products with amazing pigmentation and lasting power, so I know I’ll get plenty of use out of this palette. I’ve been playing with the pieces of this palette ever since I brought it home with me, but today bring you one of my favorite looks. Below are photos of the eye look, step by step – directions are in each photo caption. At the very end I’ll show you my before and after shot for comparison.
Highlight your brow bone & inner corner using Aura (the irridescent split pan). I chose the pink side of this dual-pan.
Apply Illusion, the peach shade, across the lid. This color is a close match to my lid shade, but I assure you it’s there!
Use Magic (the pink shade with gold shimmer) to the upper lid and crease, extending it out past the eye in a wing.
Have trouble getting a clean wing extension? Try using a folded tissue as a guide.
Apply South (the silvery taupe) to the inner half of your lid, just below the crease. Blend with Illusion and Magic where they meet.
Blend Tornado (the warm purple) along the outer V of your eye, extending it along your lower last line. Blend where it meets Magic and Illusion.
Line top and bottom lash lines with the Rockstar liner and apply mascara. I also used the metallic silver of the Oz shadow along my lower last line and applied falsies for a little extra oomph.
You’re all done! This look is a quick, easy way to play with the majority of the colors in the palette. It’s feminine and delicate, but still is a step outside the average shadow look. When eyes are open, it looks pretty – the wow factor comes in when your lower your eyes, giving a peek at the whole lid. I dabbed on a little blush, then used the Glinda lip pencil included with the palette to color in my whole lip. Ready to see a before and after? Click to enlarge:
Before
After
Kisses for a sweet look!
What do you think? Do you identify with the good witch? Think you could pull off her feminine but fearless look?
Next up – bringing out your dark side with the Urban Decay Theodora palette!
About Me –
My name is Jay and I’m new to the blogging scene! I’m a teacher in my mid-20’s and also work at a beauty retailer, which means I frequently get the inside scoop on new trends and products.
I have a love for beauty in all its forms and my blog Wayfaring Beauty reflects that. I have a dual focus on my blog – beauty and travel. Posts focus primarily on beauty products, but may occasionally collide with themes of places or veer off-course to highlight other things that I find beautiful in this world (such as places I’ve traveled or cultures I’ve encountered). I’ve traveled to countries in North America, South America, Europe, and Africa; my goal is to someday be able to say that I’ve stepped foot on every continent. I’ve been to Disney several times and love all things Disney-related, so Disneyways is the perfect spot for me to guest blog 🙂
Head on over to WayfaringBeauty.com to check out more of my posts! I post daily and love to hear back from my readers 🙂 You can also follow me on Twitter at @WayfaringBeauty.
Flame Tree BBQ is located near the Discovery Island Bridge to Dinoland. Flame Tree has beautiful views of Expedition Everest over the Discovery River, this is especially nice when the sun is setting over the mountain. All seating is located outdoors but there are some pavilions to shade you from the Florida sun. The BBQ menu features ½ Rib Platter with baked beans & cole slaw, 1/2 Smoked Chicken Platter with baked beans & cole slaw, Rib and Chicken Combo with baked beans and cole slaw,Pulled Pork Sandwich w/slaw, and Smoked Turkey breast as well as a Barbecue Salad (crispy lettuce, garbanzo and pinto beans, cheddar cheese, corn, and crispy tortilla strips). For dessert you can choose from Key Lime Mousse or Chocolate Mousse. On my last visit I had the Rib/Chicken Combo, my goodness is this a HUGE meal!
Certainly enough for 2 adults to split, if you are on the dining plan you can use 1 quick service credit and save a credit for another meal. The BBQ was a wonderful sweet flavor and you can find the not so secret recipe in a few Disney cookbooks. Flame Tree’s children’s menu offers a baked chicken drumstick with two sides, a hot dog or a PBJ Sandwich. You can also order fries or onion rings and assorted beverages. This location is open for lunch and dinner and does accept the Disney Dining Plan for 1 Quick Service credit.
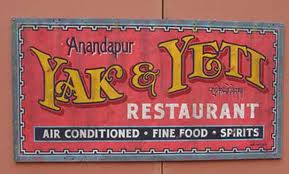
Next stop is Anandapur for Yak & Yeti counter service, this is another outdoor location for dining. Open for lunch and dinner, the Yak and Yeti Counter Service restaurant serves LARGE portions of Asian cuisine in cute little take-out cartons. Offering meals such as Honey Chicken, Sweet & Sour Chicken, and Beef Lo Mein – vegetarians don’t really have a lot of options here. They also serve an Asian Chicken Sandwich and Mandarin Chicken Salad. Side items are Egg Rolls, Fried Rice or Fries. The children’s menu offers Cheeseburger or Chicken Tenders served with carrots and fresh fruit . Dessert options here are Chocolate Cake, Frozen Lemonade or Chocolate Mousse. The Frozen Lemonade is a great choice on a hot Florida Day. Yak & Yeti is located close to two of Animal Kingdom’s most popular attractions, Expedition Everest and Kali River Rapids, because of this the Yak and Yeti counter service restaurant can get busy during peak dining times. This location is 1 Dining Plan quick service credit, however the portions are very large and can easily be split between 2 people.
Both restaurants can be very cost efficient if you are paying out of pocket for your meals while in Disney. I highly recommend either restaurant when dining in Animal Kingdom for the cost, quality and portions. And don’t forget to keep the camera out as both of these locations have amazing views of the park! So sit back, relax and enjoy the meal as well as all of the gorgeous scenery that Disneys Animal Kingdom has to offer.
Jennifer is the author of this post, an Authorized Disney Vacation Planner with Destinations in Florida Travel. Contact her here for a FREE no obligation quote when planning your next Disney Vacation.
Talk to any person who loves Epcot food long enough – and you might hear them mention School Bread. It has become a favorite of many Disney fans, almost as famous as some other portable snacks such as the turkey leg, or maybe even the Dole Whip. You can find the Disney World version of this baked good inside the Norway Pavilion at Epcot, or the Kringla Bakeri og Kafe to be exact. Here is what it will look like:
Epcot’s version of School Bread. Photo source: melsquietthoughts.com
I mentioned School Bread on facebook and really sparked some questions. That is what inspired this post today. Not ever having eaten School Bread myself, I wondered, what is it really, and why is it such a big deal to those of us who love Disney? To give you an idea of how popular it is – Amanda of MigotoChou (her store on etsy) has sold out of her “School Bread Scented Polymer Clay Epcot Walt Disney World Snack Miniature.” I just think these little things are adorable, so I had to include a picture of them too. Check it out!
Photo source: etsy.com/shop/MigotoChou
To find out more about the real, edible school bread, I did a little research.
Moose and L-Jay from MyLittleNorway.com are a fantastic source for all things Norwegian. According to the couple – School Bread (Skolebrødis) all about the “bread” which they don’t really even consider bread, but more like a bun. Before we go any further I should explain that “Skole” means school. Why do they use the word school to describe this treat? Well, because it is filled with rich vanilla cream or vanilla pudding, Norwegian School Bread is a special treat to include in your children’s lunches or to prepare for a special school gathering. Bolle is the word to describe one bun and Boller refers to two or more. For whatever reason – it seems we are all calling them school bread or “skolebrød”- when actually they are more of a School BUN – or a “skoleboller”.
When I contacted Moose and L-Jay through facebook and asked why I couldn’t find Skolebrød in my search of their site they told me this:
“They are also known as skoleboller (as they are typically made from boller dough not bread as such.)”
So if you search skoleboller on their site – what you see if the actual food that has inspired Epcot’s famous school bread. My next question – what is boller dough and how is it different then bread?
To quote mylittlenorway.com: “To me, a bolle just seems like a hot-cross bun without the hot-cross and eaten everyday rather than just Easter. But to a Norwegian the bolle is a way of life.”
Skoleboller (school buns) are boller with a custard center and an iced coconut topping. They are VERY common in Norway. Every supermarket stocks a fresh batch in the bakery section. When a Norwegian has a choice between plain boller and skoleboller, the latter always wins. No wonder they made their way to the Norway Pavilion in Epcot.
To find out more about Epcot’s version of School Bread I went to the Disney Food Blog. They are quoted as saying this little slice of heaven is absolutely delicious. It is stuffed with vanilla custard, surrounded by a light sweet pastry, and sprinkled with coconut. They described it as magnificent and adding to the delight is the fact that the custard is chilled, making School Bread the perfect compliment to a hot Epcot afternoon. Believe it or not, according to DFB, School Bread actually isn’t too sweet! Which is possibly why so many people love it. Regarding taste and texture, the bread is a cross between a cinnamon roll and a dinner roll. It’s not super moist — more springy. But the sweet vanilla custard is extremely smooth and abundant. They go on to say the basic icing and coconut on top give it just enough extra sweetness.
Have you tried School Bread? What did you think of it?
This is a guest post by Samantha Jolicoeur that contains her suggested packing list for your next trip to Disney World. Please see below for Samantha’s bio and a link to join her facebook group. Please contact Krista atDisneywaysif you are interested in guest blogging.
How to Pack for Your Trip to Walt Disney World by Samantha:
If you are new to Walt Disney World, you may be wondering;
“What do I need to pack for Walt Disney World?”
I’m not generally an over-packer but I do like to cover all my bases when it comes to visiting the World!
Floridian weather can be unpredictable and we can get sick at the drop of a hat, but why spend your dole whip money on WDW’s overpriced cold meds or ponchos? This checklist is something I have been using and checking twice, each and every time I visit the happiest place on Earth!
– Clothes – socks, underwear, pajamas, shorts, capris, tanks, t-shirts, one hoodie/light jacket (depending on season), one pair of jeans (again…depending on season)
NOTE: You will want to pack for your length of stay. Remember, resorts on WDW property have laundry services. Doing laundry while on vacay not for you? Throw it in while you sit by the pool!
– Bathing suits
– Shoes – flip flops and runners
– Shampoo and conditioner (those little ones aren’t enough from Disney, but I still hoard them)
– Toothbrush and toothpaste
– Hairbrush, straightener and hair products. (Hairdryers are in each WDW resort room)
– Makeup (keep it basic: liner, mascara, shadow)
– Meds: Allergy pills, cold and cough pills, aspirin (just in case), any prescriptions.
– Hair clips, elastics
– Razors
– Deodorant
– Confirmations – ADRs, Park hours and EMH lists.
(I am crazy about this, I have a WDW travel book that I write up)
– Lanyards (I like to wear it to hold my Key to the World/Park ticket)
– Laptop and charger
– Camera and battery charger
– Passports, money and traveller’s cheques, ID (I seperate my “tip” money from souvenir cash)
– Watch
– Dollar store ponchos (yet to use them *knocks on wood* – bringing your own saves you money!)
– Hats
– Sunscreen!
– Sunglasses
– Aloe vera, polysporin, etc.
– Ziploc bags (keep thing dry on wet rides, etc)
– Collapsible Cooler
– Stroller (if needed)
– Backpack/fanny pack/beach bag.
Other Ideas:
– Walkie talkies for the parks
– Mist fans
– Decorations for your hotel room window
– In-room snacks
– Cell phone and charger
To me, this is a very basic list of what you need to bring with you. Some people bring their own autograph books, pens, towels … but that is up to you! I look at it this way, if you are flying to WDW, you’ll want more room (and spending money) for your souvenirs. When I make my list, I write it out and leave a little check box beside each item, and it doesn’t get checked off until it is actually packed. I wouldn’t want to leave anything important behind!
Your trip to Disney will be magical though, whether or not you forget your favorite t-shirt, but hopefully, with this list you won’t!
About Samantha:
My name is Samantha and I am a Disney-aholic! It’s true. I’ve always loved all things Disney, but didn’t make my first trip until I was 21 years old. It only took that one day at Magic Kingdom to get me hooked. I don’t get to go as often as I’d like, but I have made it my own personal hobby to research Walt Disney World as much as possible and I enjoy lending some of my advice to others. I have a husband and a beautiful son, both who love Disney (maybe not QUITE as much as myself). I’d rather be a pirate than a princess, although being a princess wouldn’t be too bad either! Please, feel free to come join my happy, laughin’ place on Facebook “Disney Dreamers“- we discuss all things Disney, do trivia and giveaways, and most importantly, make new friends who share the same passion for Disney!
Yo ho, yo ho, a pirates life for me!
My husband, some family members, and I were able to enjoy dinner at the brand new Be Our Guest Restaurant on November 18, 2012. It was a beautiful, cool night! Everyone at the table really enjoyed their food and the overall experience. I would have to agree with the consensus that this is the best food I have ever eaten in the Magic Kingdom. I shared many pictures of our meal on facebook and instagram so today I wanted to share the thoughts and photos with you from some other great bloggers!
By far…one of the most creative write ups I have seen so far was from my friend Wendy. Read it here at mymagic100.wordpress.com! Join in her experience – synchronized to the lyrics of the song! Doubtful that you will see this anywhere else!
For all of you detail oriented foodies out there – check out AJ over at the Disneyfoodblog.com. AJ has posted photos of everything on the menu, all 3 dining rooms…and even some of the first alcoholic beverages ever to be served inside the Magic Kingdom. Tired of those nasally sounds you may have heard from your kids all day? Have some wine with your whine. You will only find these libations inside Be Our Guest!
While you’re at it – I hope you will subscribe to get Disneyways updates by email – so you never miss a post!
Even though I was born and raised in Orlando, I didn’t know about 3D Disney’s Dessert Discovery Party until I actually took a job booking Disney dining for guests. Most of us that are born here have heard of the Epcot Food and Wine Festival but really don’t know much about it, we only think we do. When I excitedly tell my friends and family that the Epcot food and wine festival is coming – I usually get a raised eyebrow and the same question, “Isn’t that the thing where you get to try food and wine from all the countries?”
Well… yes… but it’s also the chance to book some wonderful experiences, demos, and tastings – the way only Disney could do them. You just might even meet some TV stars, and you’ll definitely get a chance to rock out to some tunes courtesy of some of the best bands of the 80’s, 90’s, and 2000’s. But these are just the Food and Wine Festival opportunities that Disney tends to focus their advertising on. There is so much more to enjoy!
You may want to book early for the Dessert Party, although there still seem to be seats available for this year. If you are planning ahead – and you enjoy this sort of thing – you will want to start studying up on what’s new, what’s popular and what’s changed…beginning in early August, and even July 2013.
Events like this one are VERY popular and sometimes sell out on the first day we can book them.
I had been reading about Epcot’s “3D” Dessert Discovery Party for years. It sounded like a wonderful experience – and being the dessert lover that I am, I thought, how could I go wrong?
“Join us for a dessert lover’s dream at the Epcot International Food & Wine Festival 2012! Indulge in decadent desserts and cordials, then enjoy a V.I.P. viewing of IllumiNations: Reflections of Earth.
Where: World ShowPlace Events Pavilion, located between the Canada Pavilion and the United Kingdom Pavilion in World Showcase.
When: Fridays, October 5, 12 and 26 and November 2 from 8:00 p.m. to 9:30 p.m.
Cost: $55 per person, plus tax. Gratuity included. Epcot Theme Park admission required.
For General Admission reservations, please book online or call (407) WDW-FEST or (407) 939-3378. Space is limited, so be sure to book in advance.:”
You read that right — FIFTY FIVE DOLLARS plus tax. Whew!! Pretty steep for me. I justified it as a “research” expense for my readers and busted out my credit card on the very first day of bookings. After months of waiting, the occasion finally arrived. October 5th fell on a Friday this year. All this time I thought I would be going by myself, but I was pleasantly surprised to have my neighbor Tristan express interest in coming along. Luckily she was able to book a seat just in time – and we were off on our quest to discover wonderful Disney desserts.
We were headed to The World Showplace Events Pavilion. It is located between the Canada and UK pavilions in World Showcase at Epcot. This is where they hold many of these type of special events. I think it looks so pretty at night. This photo belongs to http://www.disneytravelbabble.com – the rest are from Disneyways.
The party didn’t start until 8PM, so Tristan and I decided to sample some of the best and most popular eats that the Food and Wine Festival had to offer. Before taking off though, I double checked with a cast member who told us we would be given a wrist band upon entrance – and they can usually just look up the reservation by last name. People were already lining up by 7pm – but Tristan and I were hungry – and we are not much for lines. At $55 a seat we figured it wasn’t a big rush, Epcot could afford to save 2 seats and some desserts for us. This proved to be a smart decision. There were a lot of people – but the pavilion is BIG, and the dessert stations are plentiful – so there was no shortage of food or seats when we got in.
After our snacks from the kiosks of the “world” we checked in at the podium and were handed some pretty cool 3D glasses. There is just no way to describe what you see through these things unless you look at these chandeliers and imagine Mickey icons being all around them.
From here we were treated to the sounds of a live band singing all your typical “sweet” and “candy” themed songs…Sugar Sugar…Lollipop…Candy…you get the idea.
I loved the music and thought the band was great. But that’s no surprise – I’m pretty cheesy like that.
The very end of this blog contains a link where you can learn more about the details, dates, and how to book the 3D Disney’s Dessert Discovery Party.
Today I wanted to take you on pictorial and video tour of my personal experience – but first – here’s a few Disneyways tips:
Don’t sweat the long line -unless you really want to be one of the first ones inside! There are plenty of food and seats for everyone – and you won’t have to be in the serving lines nearly as long if everyone else has gotten their desserts already.
Have a snack before you go – something substantial. I recommend the Coq Au Vin from the French Kiosk! There is a “Savory” station but of course that is the longest line during the first hour of the party. This is really a time where you can eat dessert first! Pace yourself and go back for the savory stuff later – you’ll be glad you did!!
Do NOT miss the donuts flambé! They are bathed in sugar are cooked in a pan of rum – right in front of you!
4. I am not much for alcohol but even I had to try the flavored vodka!
5. I mixed it with some of the blue lemon-aid and Tristan suggested I call it the Krista Cocktail. Feel free to try it OR you could mix some flavored vodka with the Chocolate or Cranberry Water they had available and create your own signature drink!
Overall, the event was fabulous, and more than I expected. One of the best parts of the party however, is the special fireworks viewing area.
We were literally right on by the water – and I got some cool video.
Watching the fireworks through the special 3D glasses they had given us earlier was pretty much the coolest thing I had ever seen. There was no way to film it through the glasses – but believe me I tried! In fact, much to my embarrassment, you can hear my reaction and see how I turned the video camera sideways – without even realizing it. Listen closely before that… and you’ll hear the Dad behind me telling his son “I SEE MICKEYS!” Awesome.
SO – if you are big on sweets, booze, fireworks, and feeling like you are getting VIP treatment – you may want to look in to the “3D Dessert Discovery Party” as I like to call it! In closing, here are some pictures of the food stations, atmosphere, and fun!
To learn more about booking your own 3D Party – including Sweet Seats click here.
I graduated high school in 1993. I am very proud to be a part of what I consider the “big hair” generation. Just like the girl in the Peanuts cartoons – I enthusiastically embraced my “naturally curly hair”. Just to prove it – here’s a picture of me at about that time.
You can stop laughing now. I still love my big hair, I just style it a little differently. Have you seen the trailers for the brand new Disney Pixar movie coming out on June 22nd? It’s called Brave, and I know it sounds weird, but bringing big hair back may be one of the things that excites me most about this movie. Merida is the main character, a skilled archer, inadvertent unleasher of chaos, a beastly curse undoer, even a Disney Princess for the feminists – and she does all of this while redefining what it meant to have beautiful BIG hair. I haven’t even seen the movie and I love her already.
Speaking of Disney Pixar movies…summer is upon us here in Florida, and I think it’s way too hot to be outside. That’s why I want to tell you about the Disney Pixar Summer Movie Weekend. In the midst of remembering our fallen heroes, along with all the planning and grilling this weekend, you just might want to find some time to relax and unwind! It’s pretty exciting that Disney is bringing back some Pixar classics. That’s right – this weekend you can catch Ratatouille, Toy Story 3, Up, and Wall-E at participating AMC Theaters. Prices vary but many tickets are just $6! Click here to get tickets and a list of participating AMC Theaters.
Maybe you’re more like me. To be honest, I’m not the biggest fan of seeing movies in theaters. Why risk having some kid kick my chair through the whole thing when 2 months later I could sit on my couch with my dog and enjoy the movie on my own time? Pixar movies, however, are an exception. One has to be in a real movie theater to fully appreciate the graphics, sound, and detail of these movies. My fantasy is to head to AMC Downtown Disney 24 Dine-in Theater to see Ratatouille for the Saturday showing. I haven’t had a chance to go to the new theater or (I’m ashamed to say it…) to see Ratatouille! Alas, with so much going on, I’m afraid it will just remain a fantasy.
I will try to plan a little better and get out to see Brave after June 22nd. Who knows? Maybe I will even put on my MC Hammer pants and do a little dance for everyone in line for tickets that day. (Please Hammer – don’t hurt ‘em!!) I will definitely use lots of mousse and a diffuser on my hair for the occasion – that’s a given. At least I will look hot when they haul me off to crazy town.